Assignment Details
For this assignment you will work individually.
This assignment consists of three parts. Unlike the previous two assignments, all parts of this assignment will be performed through a submission website (requires Carleton's VPN). No files should be uploaded to Brightspace. Once you complete all three parts on the submission website, you are done!
Instructions on how to copy files to and from your local machine and your VM are available on the General page.
In this assignment, you will learn about the Public Key Infrastructure (PKI) system. You will also learn about requesting a certificate from a CA, validating certificates, and using encryption/decryption functions within a program.
Much of this assignment can be done without the use of an OpenStack VM; however, certain useful things exist within the VM such as: a certificate you'll need for Part C (which is also available on in Part C on the submission website), a Python installation (if you don't want to install one on your own machine). This assignment has a VM on the SCS OpenStack platform (please consult the General Page for further details and instructions). The name of the VM snapshot for this assignment is comp4108-w24-assignment-03. To protect your VM against abuse, you will automatically be prompted to choose a new password upon your first login.
If you run into any technical issues with the assignment page or submission website, please let Ethan know so he can fix it.
Introduction
An X.509 certificate is a digitally-signed document binding an identity to a public key. For a program to validate the certificate's signature, the program needs to have access to the public key corresponding to the private key used for signing. Cerificates are issued by a Certificate Authority (CA). When an Operating System (OS) is installed, it comes with a set of public keys belonging to many CAs. Each key is saved inside a certificate. This certificate is self-signed, i.e., it is signed by the private key corresponding to the public key in that certificate. We say an OS trusts a CA when the CA's own certificate (the self-signed one) is among the set of certificates that is shipped with the OS. For Linux, the whole set is written in a single file: /lib/ssl/certs/ca-certificates.crt. See here for a discussion about variations in trusted CAs across OSes.
To request a certificate from a CA, a website first generates its own public-private key pair, embeds the public key into a certificate signing request (CSR), and sends it to a CA. A CSR is simply a file that looks like a regular certificate, but is unsigned. The two most important pieces of information in a CSR (and a certificate) are the subject's (owner) name and their public key. In an X.509 certificate, the subject name is placed in the Common Name (CN) field of the Subject structure. The public key is placed in the Subject Public Key Info field. The Subject structure also contains other fields like country and organization name, but the CN field is typically the most important. For a website, this field contains the domain name (e.g., security.scs.carleton.ca). It is the CA's responsibility to validate ownership of the name and the private key corresponding to the enclosed public key before issuing a certificate.
The VM you will use for this assignment has been modified to trust one additional CA, on top of the default trusted set. This CA is under our control, and is only used for this assignment.
Familiarize yourself with the
openssl command. You can use it to generate certificate signing requests, validate certificates, and for general encryption and decryption. The man page for openssl will be useful. You are encouraged to browse through the SEE ALSO section at the bottom of the man page (or here for easier browsing).You may also use the
ssh-keygen command, which generates cryptographic keys. See man ssh-keygen for more information.
Submission Details
The submission website will ask for your login credentials. Each student has a unique, system-generated username/password. By now, you should have received these credentials already via email. If not, email the TAs.
You must be connected to Carleton's VPN to access the submission website.
Part A: Certificate Issuance (15 marks)
-
Generate a new RSA public-private key pair. Tools like
ssh-keygenandopensslcan help with that.
-
Using the private key from Step 1, generate a certificate signing request (CSR). You can use whatever information you want for the subject field, but the Common Name (CN) portion MUST be your student ID (i.e., the ID you used to login to this website), e.g.,
/CN=123456789. - Go to the submission website, login with your username and password.
- Click the Part A link, paste in your CSR from Step 2, and then Submit.
-
If your CSR was formatted correctly, and has your student ID in the
Common Name (CN)field, your signed certificate will be presented to you. This certificate will be available to you on the menu page, and remains there as a proof that you have completed Part A. Download the signed certificate (copy and paste it into a file on your machine). You will use it for Part B.
Note:
Our CA's certificate is calledcacert.crt. This is the CA that has issued and signed your CSR. It can be found in your OpenStack VM in/usr/share/ca-certificates.Hint:
On Windows, if you save your certificate as a.crtfile, you can view all of its fields in the Windows certificate viewer. Likewise in Ubuntu, using View File. You can also use the--textoption foropensslto decode (read) a certificate, e.g.,openssl x509 -in signed_cert.crt --text.
Interested to know more about how certificates are issued in the real-world? Let's Encrypt (a popular CA) has a nice documentation on it. Let's Encrypt uses ACME to automate the certificate issuing process. If you have completed the above steps successfully, then you have replicated the core functionality of the ACME protocol.
Part B: Encryption and Decryption (50 marks)
Background
A session key is used to symmetrically encrypt and decrypt a communication session. It is typically used for one session, and should be discarded after the session ends. New keys should be generated for new sessions. In TLS, the two communicating parties (e.g., client and server) generate a set of session keys at the start of any communication session, during the TLS handshake. Consult the RFC for TLS (RFC8446) for more details.
Requirements
In this part of the assignment, you will have fun encrypting and decrypting messages. We recommend that you use pre-built Python crypto libraries for that (see pycryptodome). A server has been setup to test whether you were able to properly encrypt and decrypt with both, symmetric and asymmetric keys.
The server implements the following protocol. The notation {x}y means encrypt x with key y. The labels, M1, M2, M3, and M4, are only used so that we can reference these messages in our explanation below.
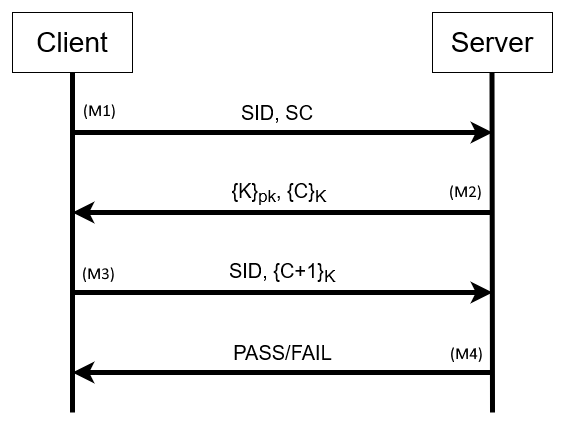
You will implement the Client side of the above protocol. In each step, you can use either of the following two methods to transmit messages to the server: (1) sending the message as an HTTP POST (explained in each step, below), or (2) pasting your message directly into the web interface (see Part B on the submission website).
The server is written in Python, and uses the pycrypto library (or, the more modern drop-in replacement, pycryptodome) for encryption and decryption. We thus strongly recommend that you also use Python for the Client, regardless of which of the two aforementioned methods you choose to transmit messages to the server. Using the same language as the server, Python, reduces the space of compatability issues that may arise between different languages. However, you are ultimately free to use any language of your choice.
-
M1. In the first step of the exchange from your client to the server, you will send the following:
- Your student ID (SID) -- [Format: STRING]
- Your signed certificate (SC, from Part A) -- [Format: STRING, same format as the string returned in Part A]
- Web browser: If you have already completed Part A, these will be auto-filled into the web form for you.
- HTTP POST: Post this information to
http://134.117.225.40/getchallenge_return.php. The two required POST request parameters aresidfor the student ID, andcertfor the signed certificate.
-
M2. The server will then validate your certificate, and extract your public key, pk, from the certificate (note: this is the public key you generated in Part A). It will then return the following:
- A session key (K) encrypted with your public key (pk).
- The function
PKCS1_OAEPis used for encryption. - A string of Base64-encoded text.
- The function
- A challenge value (C) encrypted with the above session key, K. The challenge, C, once decrypted, is a series of bytes.
- Encrypted with
AES-256symmetric cipher using theECBmode. - A string of Base64-encoded text.
- Encrypted with
Hint:
The returned data will be in the structure of a JSON string, and can be read as such (e.g., Python'sjson.loads()). The encrypted session key (K) will be under the key (note: key-value pair, not crypto key)sessionkey_encrypted, and the encrypted challenge value (C) will be under the keychallenge_encrypted.
- A session key (K) encrypted with your public key (pk).
-
M3. Your Client code should now:
- Decode the Base64-encoded session key (K) and then Decrypt it using your private key (from Part A).
- Decode the Base64-encoded challenge (C) and then Decrypt it using session key K from the above step.
- Add 1 to the decrypted challenge value (i.e., {C+1}). You can do this however you like, but for example, you could convert the challenge to an integer, add 1, then convert back to hex. Note: this means an arithmetic +1, not append "1".
- Re-encrypt the result with the session key and then Base64-encode the encrypted text.
Hint:
The data you put into the encryption function should be a bytestring of hex characters. The combination of Python'sstr.encode()andformat()functions may be a convenient way to do this.
HINT HINT:str.encode(format(chal_plus_one_int, "x")) - Send the following:
- Your student ID (SID) -- [Format: STRING].
- The encrypted challenge+1 ({C+1}K) -- [Format: A STRING with text encoded as Base64].
- {C+1} should be encrypted (with the session key, K) with
AES-256using theECBmode.
- {C+1} should be encrypted (with the session key, K) with
- Web browser: Put this data into the web form.
- HTTP POST: Post this information to
http://134.117.225.40/sendchallenge_return.php. The two required POST request parameters aresidfor the student ID, andchallengefor the encrypted challenge {C+1}.
- M4. If the server is able to decrypt the challenge+1 {C+1} with the shared session key (K) and confirm the challenge has been successfully incremented, it will respond with an affirmative message. This can be confirmed on the menu page under the Part B drop-down, where it will read True. If you see this message, you have completed Part B, and you will receive all 50 points. Otherwise, you get 0 points for Part B. No partial marks are provided. You can try as many times as you like, but make sure the last trial is the correct one (a new trial overwrites the previous one).
Part C: Validating Certificates (35 marks)
website.com. Note: For the purposes of the assignment, self-signed certificates are not considered valid. - Login to the submission website and go to Part C. You will see 14 certificates, plus an intermediate certificate and a root certificate at the top.
-
2.5 Marks per correct answer
Use
opensslto validate each of the 14 certificates. Using the corresponding checkboxes, tick only the certificates that you find valid forwebsite.com.
Attention:
Make sure to confirm that a certificate is issued forwebsite.com. Otherwise, it is not valid.Hint:
If you are validating these certificates on the OpenStack VM,opensslwill automatically use the VM's root stores, which already includes our CA. This is the CA that we used to sign the valid certificates in displayed set. (You can confirm that by comparing the issuer of these certificates with the one that issued your certificate in Part A.) If you are validating on a different machine, you will need to manually use our CA's cert, which you can extract from the submission website in Part C or from (cacert.crt, found in/usr/share/ca-certificates).Attention:
You will observe leaf certificates that may have a certificate chain including an intermediate certificate (i.e., {Root CA --> Intermediate CA --> Leaf certificate} or {Root CA --> Leaf certificate}). If you find that you need the intermediate certificate to validate a leaf certificate, use the intermediate certificate provided on the page (top-most drop-down). -
When you are done, click Submit.
Attention:
Submitting your selections will save only your latest attempt. Each time you wish to change your answers, you must re-select all valid certificates. The Part C drop-down on the menu page will show you the selections made in your last submission.